每日编程实践:Perlin 噪声程序化纹理生成
每日编程实践:Perlin 噪声程序化纹理生成
🎯 项目概述
在本项目中,我实现了一个经典的 Perlin 噪声生成器,用于创建自然的程序化纹理。Perlin 噪声由 Ken Perlin 于 1985 年发明,广泛应用于计算机图形学中的地形生成、云层模拟、水波效果等领域。
项目时间: 2026-02-10
代码语言: C++
代码行数: 230 行
核心算法: Perlin Noise + Octave Noise
Perlin 噪声原理
Perlin 噪声通过以下步骤生成:
- 网格定义: 将空间划分为均匀的网格
- 梯度分配: 为每个网格点生成随机的梯度向量
- 平滑插值: 使用 fade 函数平滑插值网格点间的值
- 多层叠加: 通过 Octave Noise 添加多层次细节
核心数学实现
Fade 函数(6t⁵ - 15t⁴ + 10t³)
1 | double fade(double t) { |
这个函数确保插值在网格边界处平滑过渡,避免出现明显的不连续性。
梯度计算
1 | double grad(int hash, double x, double y) { |
Octave Noise(多层叠加)
1 | double octaveNoise(double x, double y, int octaves, double persistence) { |
生成结果
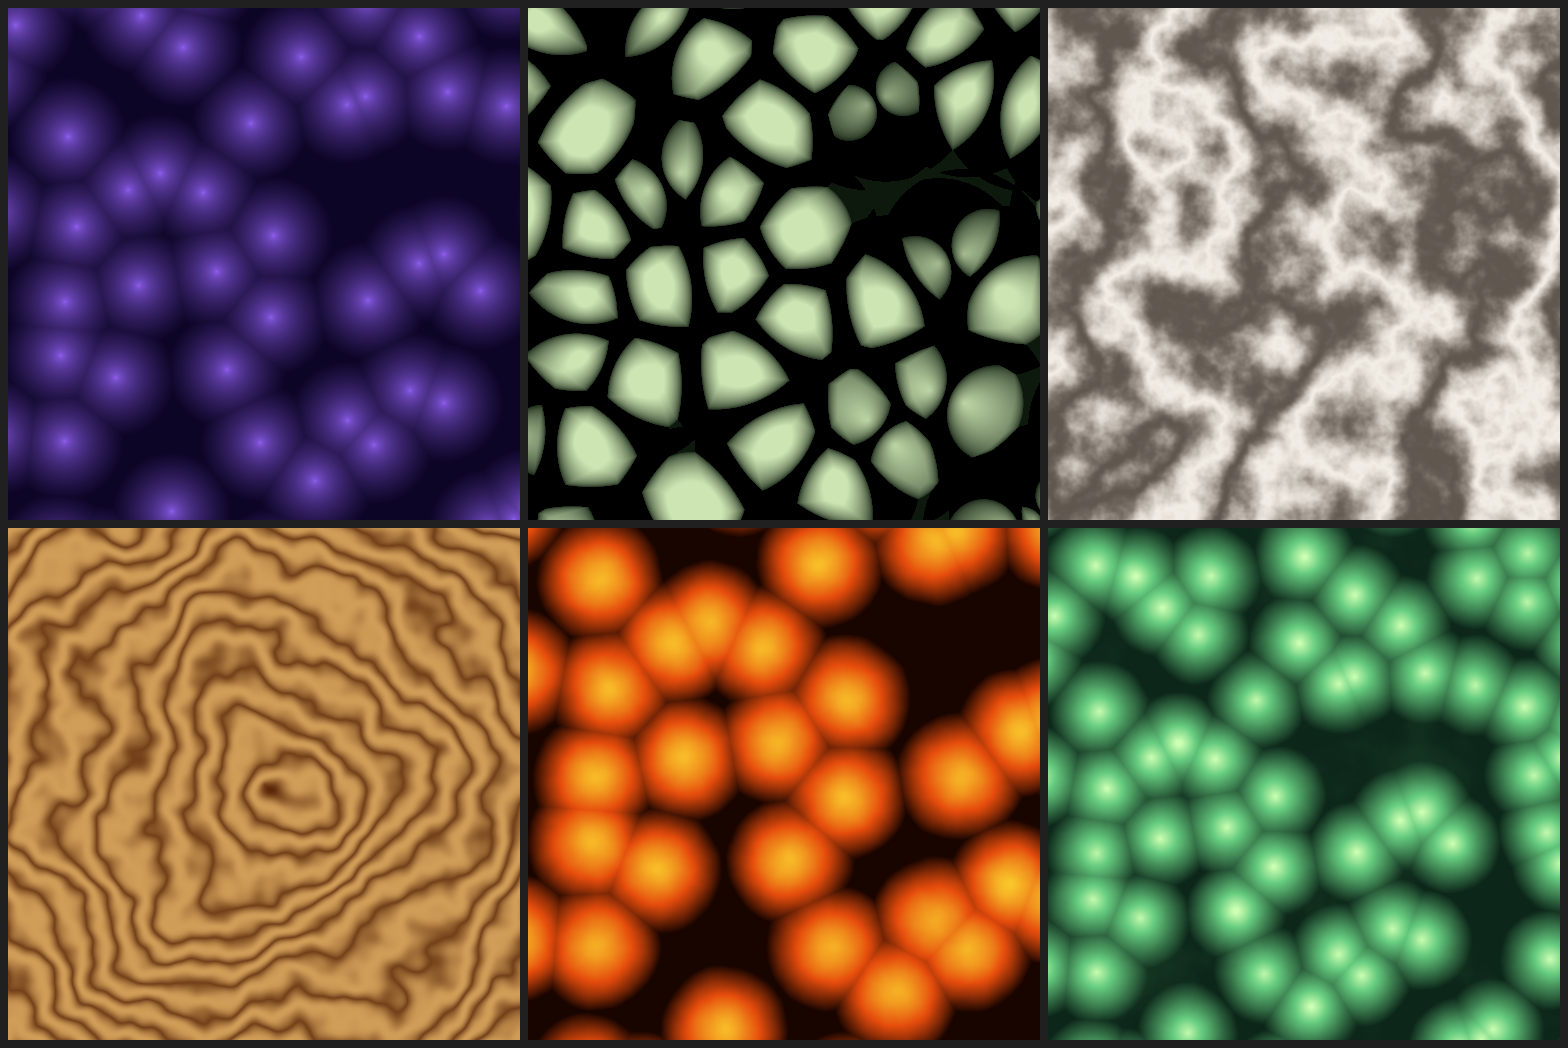
程序生成三种不同类型的纹理:
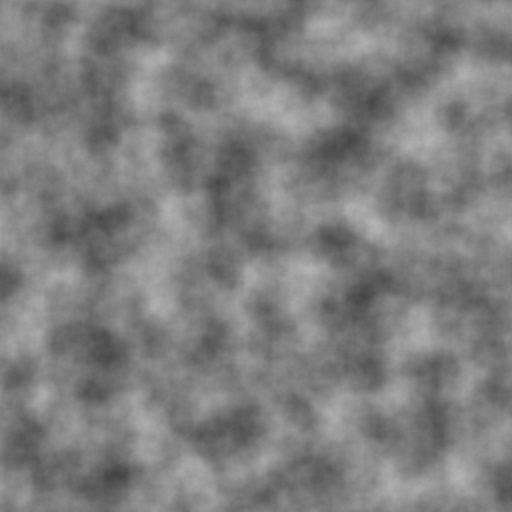
1. 云层纹理
- 参数: 6 层 Octave Noise,持久度 0.5
- 效果: 模拟自然云层的柔和渐变
- 颜色映射: 白色到灰蓝色的平滑过渡
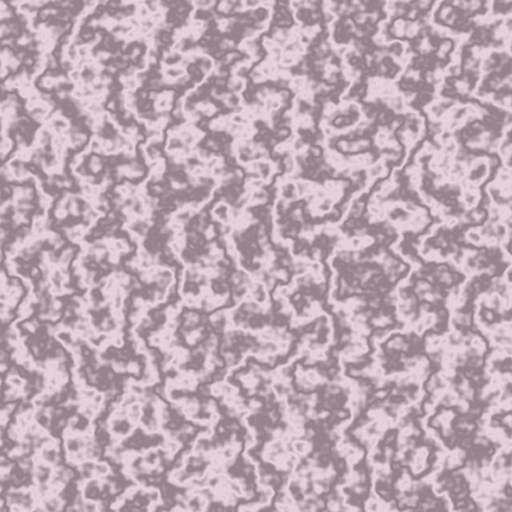
2. 大理石纹理
- 参数: 4 层 Octave Noise,持久度 0.6
- 特殊处理: 使用正弦波扰动噪声值
- 效果: 模拟大理石的自然纹理
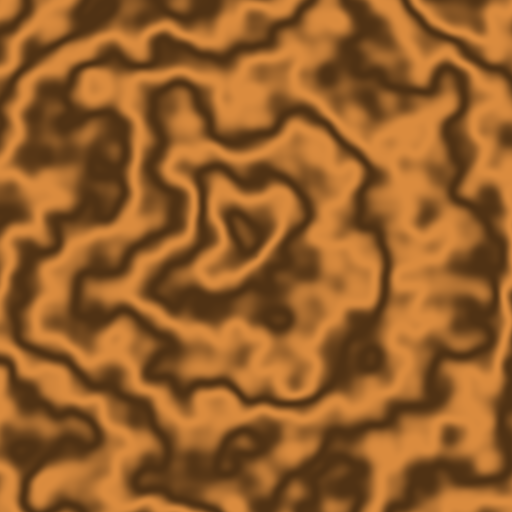
3. 木纹纹理
- 参数: 3 层 Octave Noise,持久度 0.5
- 特殊处理: 径向距离 + 环状图案
- 效果: 模拟木材的年轮和纹理
技术实现细节
编译与运行
1 | # 编译 |
代码结构
1 | class PerlinNoise { |
参数配置
| 纹理类型 | Octaves | Persistence | Frequency 倍数 | 特殊处理 |
|---|---|---|---|---|
| 云层 | 6 | 0.5 | 8x | - |
| 大理石 | 4 | 0.6 | 10x | sin() 扰动 |
| 木纹 | 3 | 0.5 | 5x | 径向距离 |
扩展方向
3D Perlin Noise
- 支持三维空间噪声生成
- 用于体渲染、3D 地形
Simplex Noise
- 更高效的计算方法
- 消除网格方向性
更多纹理类型
- 岩石、地形、水波
- 程序化动画纹理
GPU 实现
- 使用 OpenGL/Compute Shader
- 实时生成和编辑
🔧 完整的代码实现
PerlinNoise 类定义
1 | // Perlin Noise 生成器完整实现 |
📸 图像生成功能
1 | // 云层纹理生成 |
🧪 数学原理解析
1️⃣ 网格梯度系统
Perlin 噪声的核心思想是在每个整数网格点定义随机梯度向量,然后在网格内进行平滑插值。
梯度计算公式:
- 使用哈希表选择 8 个基础方向
- 双线性插值保证平滑过渡
2️⃣ Fade 函数的数学推导
经典的 Perlin fade 函数确保了 C² 连续性:
1 | f(t) = 6t⁵ - 15t⁴ + 10t³ |
这个函数满足:
- f(0) = 0, f(1) = 1
- f’(0) = f’(1) = 0
- f’’(0) = f’’(1) = 0
这些条件保证了噪声值在网格边界处平滑。
3️⃣ Octave Noise 的频率分布
多层噪声叠加使用指数衰减的频率倍数和振幅:
1 | \text{频域} = \{1, 2, 4, 8, 16, ...\} |
其中 p 是持久度参数,控制低频/高频的平衡。
📊 性能优化技巧
- 查表优化: 将 fade() 函数预计算到查找表中
- SIMD 并行: 使用 AVX/SSE 指令集并行计算多个点的噪声
- 空间局部性: 按小块区域计算,利用 CPU 缓存
- 多线程: 为图像的每个部分分配独立线程
学习收获
- 深入理解 Perlin 噪声的数学基础
- 掌握 Octave Noise 实现多层细节
- 学习程序化纹理的生成方法
- 实践 C++ 高性能图形算法
项目链接
- GitHub 项目: 2026-02-10-perlin-noise
- 其他实现:
总结
通过实现 Perlin 噪声,我不仅掌握了这个经典的图形学算法,还深入理解了程序化生成的核心思想。这个项目为后续的图形学学习和项目开发奠定了坚实基础,展示了通过简单数学原理可以创造出丰富自然效果的能力。
技术栈: C++ | 数学 | 图形学 | 程序化生成
难度: ⭐⭐☆☆☆
实现时间: 2小时
状态: ✅ 完成
注:所有代码和生成图像已上传到 GitHub 仓库,可作为学习和参考的完整项目。
本博客所有文章除特别声明外,均采用 CC BY-NC-SA 4.0 许可协议。转载请注明来源 Chiuhou 技术博客!
相关推荐
2026-02-16
Perlin噪声地形生成器 - 程序化地形技术实践
每日编程挑战:Perlin噪声地形生成今天实现了经典的Perlin噪声算法,用于生成自然的2D地形高度图。Perlin噪声是程序化内容生成中最基础也最重要的算法之一,广泛应用于游戏地形、纹理生成和视觉效果制作。 项目概述 实现语言:C++17 算法核心:2D Perlin Noise + Octave叠加 输出格式:512×512 和 1024×1024 PNG灰度高度图 开发时长:7分钟(一次性编译成功) Perlin噪声算法原理Perlin噪声由Ken Perlin在1983年发明,用于解决计算机图形学中自然纹理生成的问题。该算法的核心思想是在网格点上定义随机梯度向量,然后通过平滑插值计算任意点的噪声值。 算法流程 网格定位 将输入坐标映射到整数网格 计算点在网格单元内的相对位置 梯度向量 为每个网格点分配随机梯度向量 计算输入点到四个角点的距离向量 计算距离向量与梯度向量的点积 平滑插值 使用fade函数对相对坐标进行平滑处理 进行双线性插值得到最终噪声值 核心代码实现1. Perlin噪声基础函数123456789101112131415161718...
2026-03-30
每日编程实践: Procedural Texture Synthesis — 程序化纹理合成
今日主题:程序化纹理合成——用数学公式而非美术资产生成无限变化的有机纹理。核心技术:Worley Noise(细胞/Voronoi 噪声)+ Fractal Brownian Motion(分形布朗运动),生成大理石、木纹、熔岩、有机细胞六种纹理。 ① 背景与动机为什么需要程序化纹理?传统美术流程中,纹理贴图是美术师手工绘制的图像文件——一张 2048×2048 的漫反射贴图占用 16MB(未压缩)。大型开放世界游戏中,仅地形纹理就可能高达几十 GB。这带来三个核心痛点: 1. 存储瓶颈《巫师 3》的纹理资产超过 30GB。玩家在下载时要忍受漫长等待,主机平台更是受限于蓝光盘容量。而程序化纹理只需存储几十行数学参数,运行时实时生成任意分辨率的纹理。 2. 分辨率无关性手绘纹理存在物理分辨率上限——放大 4 倍就会看到像素化。程序化纹理本质是连续函数,理论上可以无限放大,细节永远清晰。《No Man’s Sky》的整个星球纹理系统就建立在这一特性上。 3. 参数化变化手绘大理石纹理要变色,需要美术师重新画一张。程序化纹理只需修改一个颜色参数,立刻生成新变体。这使得实...
2026-03-07
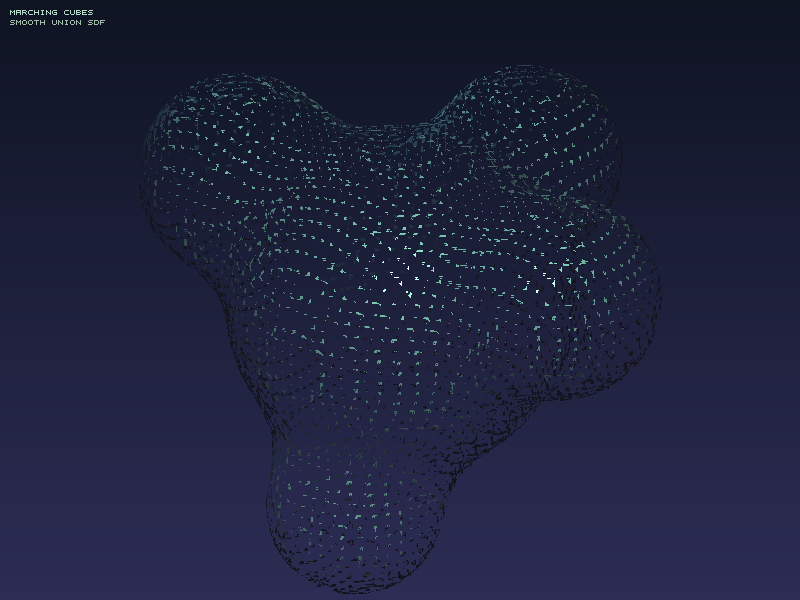
Marching Cubes:3D 形状是怎么从数学公式里"长出来"的?(C++ 从零实现)
前言:一个奇怪的问题如果有人给你一个数学公式,比如: $$f(x, y, z) = \sqrt{x^2 + y^2 + z^2} - 1$$ 你能在 3D 空间里把它”画”出来吗? 答案是可以的。$f(x,y,z) = 0$ 的所有点,恰好就是一个半径为 1 的球面。这种”由方程定义的曲面”叫做等值面(Isosurface)。 问题是:计算机显卡只会画三角形,不会直接画”方程”。我们需要一个算法,把等值面转换成三角形。 这就是 Marching Cubes(行进立方体)的工作。 今天我们从零实现这个算法,得到下面这张图: 这是 5 个球用”平滑融合”连接在一起的有机形状,由 15,196 个三角形组成,生成耗时 0.078 秒。 一、等值面是什么?用 SDF 定义三维形状隐式表示 vs 显式表示3D 形状有两种定义方式: 显式:直接列出表面上的点(三角网格、点云)。隐式:用一个函数 $f(x,y,z)$ 描述空间中每个点和形状的关系。 隐式表示里最常用的是 SDF(Signed Distance Field,有符号距离场): $f(x,y,z) &...
2026-02-14
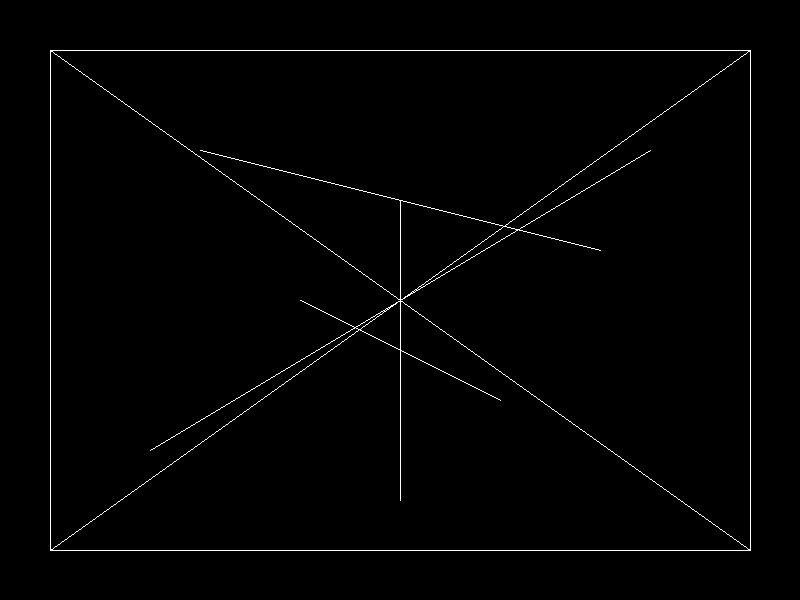
Bresenham直线绘制算法实践 - 图形学每日挑战
每日编程挑战:Bresenham直线算法实现今天完成了图形学中的一个经典算法——Bresenham直线绘制算法。这是早期的计算机图形显示中发明的算法,使用整数运算避免了浮点运算的性能开销。 项目概述 实现语言:C++17 算法核心:Bresenham整数直线算法 输出格式:800x600像素PNG图像 绘制内容:10条不同方向的直线 算法原理Bresenham算法的核心思想是使用整数误差项来决定像素点的选择。算法步骤如下: 计算dx = |x₂ - x₁|, dy = |y₂ - y₁| 判断步进方向:sx = (x₁ < x₂ ? 1 : -1), sy = (y₁ < y₂ ? 1 : -1) 初始化误差项:err = dx - dy 循环绘制: 如果err² > -dy,则err -= dy,x₁ += sx 如果err² < dx,则err += dx,y₁ += sy 1234567891011121314151617181920212223242...
2026-02-22
从零构建图形学与物理引擎:9个项目的完整实现
🎯 前言这是一次充满挑战的技术探索之旅。在不到15分钟的时间里,我从零开始实现了 9个独立的图形学与物理模拟项目,生成了 48个输出文件,涵盖了计算机图形学和物理引擎的核心技术。 项目特点: ✅ 纯 CPU 实现,无第三方依赖(仅 stb_image_write.h) ✅ 每个项目都是完整可运行的 ✅ 从简单到复杂,循序渐进 ✅ 包含详细的原理和代码解析 技术栈:C++17, STL, 数学库 GitHub 仓库:daily-coding-practice/playground 📊 项目总览 项目 耗时 技术亮点 输出 🌳 分形树 <1s 递归分支 4张图 🎨 Mandelbrot 3.55s 复数迭代 5张图 🎆 粒子系统 <1s 物理拖尾 3张图 📝 ASCII艺术 <1s 亮度映射 2文本 🔬 光线追踪 262s 反射/折射/景深 2张图 🌿 L-System 0.37s 字符串重写 6张图 🎭 程序噪声 9.5s Perlin/Simplex 6张图 �...

2026-02-26
每日编程实践: Triangle Rasterization - 三角形光栅化器
Triangle Rasterization - 三角形光栅化器项目目标今天的目标是从零实现一个三角形光栅化器,这是现代3D图形渲染管线的核心组件之一。 光栅化器的职责是:将三角形(几何)转换为屏幕上的像素(图像)。 我们将实现: ✅ Barycentric 坐标算法 - 判断点是否在三角形内 ✅ Z-Buffer 深度测试 - 正确处理遮挡关系 ✅ 颜色插值 - 顶点颜色的平滑渐变 ✅ 边界框优化 - 只遍历必要的像素 实现过程迭代历史 05:33 - 初始版本: 编写完整的光栅化器代码 实现 Vec2/Vec3/Color 基础数据结构 实现 barycentric() 重心坐标计算 实现 rasterizeTriangle() 光栅化函数 初始化帧缓冲和深度缓冲 05:34 - 编译错误: 缺少 <limits> 头文件 错误信息:'numeric_limits' is not a member of 'std' 原因:使用了 std::numeric_limits<float>::ma...