每日编程实践:简单的光线追踪器渲染球体
今天的目标是构建一个简单的光线追踪器来渲染一组球体场景,继续探索图形学中的光线追踪基础知识。
项目概述
技术要点
光线追踪基本原理
光线追踪的核心思想是从相机发射光线穿过每个像素,检测光线与场景中的物体是否相交,然后计算相交点的颜色。
三维向量运算实现
光线追踪涉及大量的三维向量运算,为此需要实现基础的向量数学:
1
2
3
4
5
6
7
8
9
| struct Vec3 {
float x, y, z;
Vec3 operator+(const Vec3& v) const { return Vec3(x + v.x, y + v.y, z + v.z); }
Vec3 operator-(const Vec3& v) const { return Vec3(x - v.x, y - v.y, z - v.z); }
float dot(const Vec3& v) const { return x * v.x + y * v.y + z * v.z; }
Vec3 normalize() const { float l = length(); return l > 0 ? Vec3(x/l, y/l, z/l) : *this; }
};
|
光线表示与球体相交算法
光线用起点和方向向量表示:
1
2
3
4
5
6
| struct Ray {
Vec3 origin;
Vec3 direction;
Vec3 at(float t) const { return origin + direction * t; }
};
|
光线与球体的相交检测基于二次方程求解:
1
2
3
4
5
6
7
8
9
10
11
12
13
14
15
16
17
18
19
| bool Sphere::intersect(const Ray& ray, float& t) const {
Vec3 oc = ray.origin - center;
float a = ray.direction.dot(ray.direction);
float b = 2.0f * oc.dot(ray.direction);
float c = oc.dot(oc) - radius * radius;
float discriminant = b * b - 4 * a * c;
if (discriminant < 0) return false;
float sqrtD = sqrt(discriminant);
float t0 = (-b - sqrtD) / (2.0f * a);
float t1 = (-b + sqrtD) / (2.0f * a);
t = t0;
if (t0 < 0) t = t1;
if (t < 0) return false;
return true;
}
|
简单着色模型
相交点的着色使用了简单的光照模型:
1
2
3
4
5
6
7
8
9
10
11
12
13
14
15
16
17
18
19
20
21
22
23
24
25
26
27
28
29
30
| Vec3 simpleTrace(const Ray& ray, const std::vector<Sphere>& spheres) {
float minT = FLT_MAX;
int hitSphere = -1;
float t;
for (size_t i = 0; i < spheres.size(); i++) {
if (spheres[i].intersect(ray, t) && t < minT) {
minT = t;
hitSphere = i;
}
}
if (hitSphere == -1) {
float t = 0.5f * (ray.direction.y + 1.0f);
return Vec3(1.0f, 1.0f, 1.0f) * (1.0f - t) + Vec3(0.5f, 0.7f, 1.0f) * t;
}
Vec3 hitPoint = ray.at(minT);
Vec3 normal = spheres[hitSphere].getNormal(hitPoint);
Vec3 lightDir = Vec3(0.0f, 1.0f, 0.5f).normalize();
float diffuse = std::max(0.0f, normal.dot(lightDir));
return spheres[hitSphere].color * (0.3f + 0.7f * diffuse);
}
|
PPM图像格式输出
光线追踪器的结果以PPM格式输出,这是一种简单的图像格式:
1
2
3
4
5
6
7
8
9
10
11
12
13
14
15
16
17
18
19
20
21
| void savePPM(const std::vector<Vec3>& pixels, int width, int height, const std::string& filename) {
std::ofstream file(filename);
file << "P3\n" << width << " " << height << "\n255\n";
for (int y = 0; y < height; y++) {
for (int x = 0; x < width; x++) {
int idx = y * width + x;
Vec3 pixel = pixels[idx];
int r = static_cast<int>(std::min(255.0f, std::max(0.0f, pixel.x * 255.0f)));
int g = static_cast<int>(std::min(255.0f, std::max(0.0f, pixel.y * 255.0f)));
int b = static_cast<int>(std::min(255.0f, std::max(0.0f, pixel.z * 255.0f)));
file << r << " " << g << " " << b << " ";
}
file << "\n";
}
file.close();
}
|
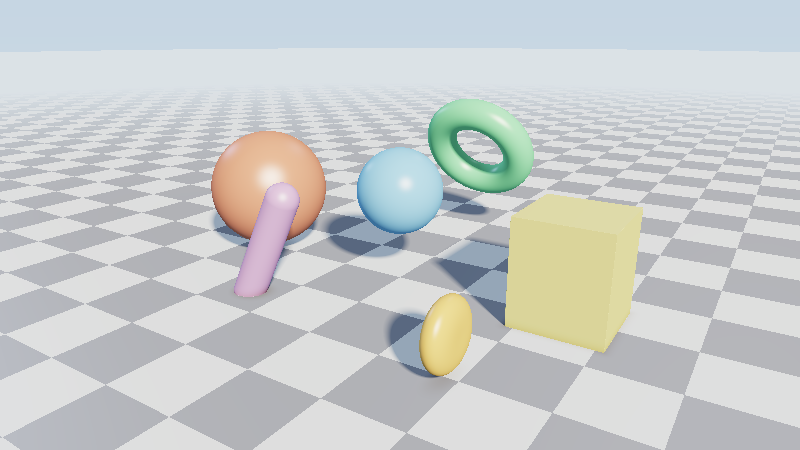
效果展示
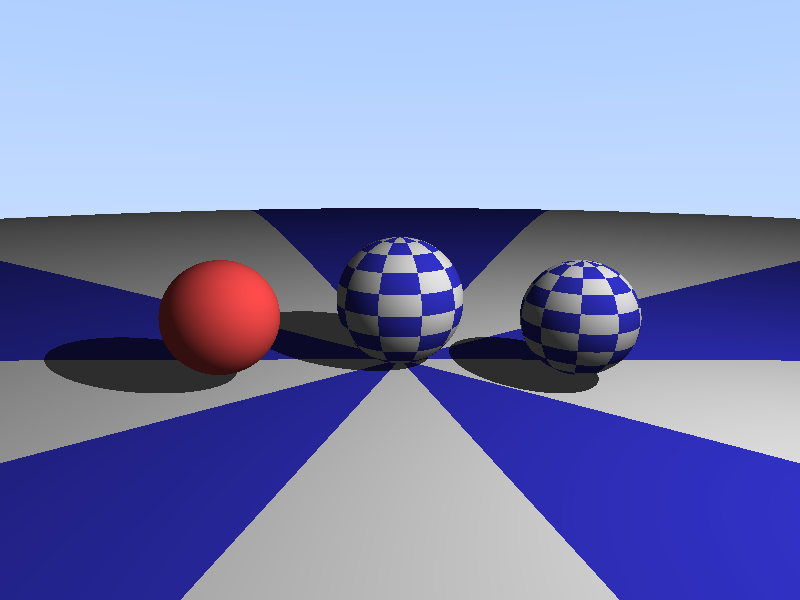
今天的简单光线追踪器渲染了包含4个球体的场景:
- 主红色球体:中心位置(0,0,-2),半径0.5,颜色(1.0,0.2,0.2)
- 侧边绿色球体:中心位置(1,0,-2),半径0.3,颜色(0.2,1.0,0.2)
- 前景蓝色小球:中心位置(-0.7,-0.1,-1),半径0.2,颜色(0.2,0.2,1.0)
- 大型地面球体:中心位置(0,-100.5,-1),半径100,颜色(0.8,0.8,0.8)
渲染结果如下:
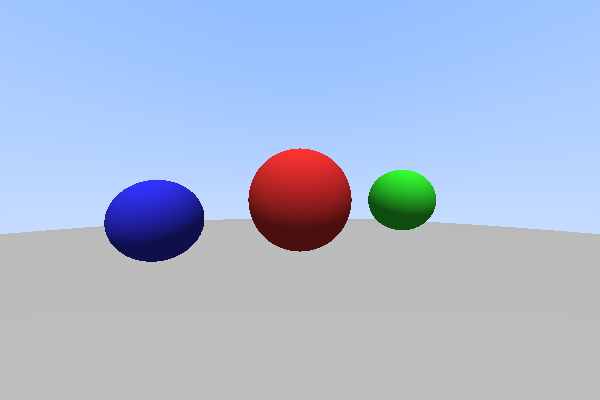
渲染说明:
- 图像分辨率:600×400像素
- 背景:渐变的蓝白天空效果
- 光照方向:从上方(0,1,0.5)照射
- 着色模型:基础漫反射+环境光
核心代码实现
完整的实现中,主要组件包括:
- 相机设置:位于原点(0,0,0),viewport的尺寸根据宽高比计算
- 光线生成:对每个像素计算对应的光线方向
- 场景遍历:对每条光线检测与所有球体的相交
- 着色计算:根据相交结果计算像素颜色
- 图像输出:将计算结果保存为PPM格式
以下是主渲染循环:
1
2
3
4
5
6
7
8
9
10
11
12
13
14
15
16
17
18
19
20
21
22
23
24
25
26
27
28
29
30
31
32
33
34
35
36
37
38
39
40
41
| int main() {
const int width = 600;
const int height = 400;
std::vector<Vec3> pixels(width * height);
std::vector<Sphere> spheres;
spheres.push_back(Sphere(Vec3(0.0f, 0.0f, -2.0f), 0.5f, Vec3(1.0f, 0.2f, 0.2f)));
spheres.push_back(Sphere(Vec3(1.0f, 0.0f, -2.0f), 0.3f, Vec3(0.2f, 1.0f, 0.2f)));
spheres.push_back(Sphere(Vec3(-0.7f, -0.1f, -1.0f), 0.2f, Vec3(0.2f, 0.2f, 1.0f)));
spheres.push_back(Sphere(Vec3(0.0f, -100.5f, -1.0f), 100.0f, Vec3(0.8f, 0.8f, 0.8f)));
Vec3 cameraPos(0.0f, 0.0f, 0.0f);
float aspectRatio = float(width) / float(height);
float viewportHeight = 2.0f;
float viewportWidth = aspectRatio * viewportHeight;
for (int y = 0; y < height; y++) {
for (int x = 0; x < width; x++) {
float u = float(x) / float(width - 1);
float v = float(height - y - 1) / float(height - 1);
Vec3 pixelPos = Vec3(
cameraPos.x + (u - 0.5f) * viewportWidth,
cameraPos.y + (v - 0.5f) * viewportHeight,
cameraPos.z - 1.0f
);
Ray ray(cameraPos, pixelPos - cameraPos);
Vec3 color = simpleTrace(ray, spheres);
pixels[y * width + x] = color;
}
}
savePPM(pixels, width, height, "output.ppm");
std::cout << "渲染完成!" << std::endl;
return 0;
}
|
学习收获
通过今天的简单光线追踪器实践,我学到了以下要点:
1. 光线追踪的基本流程
理解了光线追踪的基本原理:从相机发射光线,检测与物体的相交,计算相交点的颜色。这是一个从”像素到场景”的过程,与光栅化从”场景到像素”的思路截然不同。
2. 三维向量运算的重要性
在图形学中,大量的计算都基于向量运算。今天的实践让我更加熟悉了向量的点积、归一化等操作在相交检测和着色计算中的应用。
3. 二次方程求交算法
光线与球体的相交检测看似简单,却包含了丰富的数学知识。通过求解二次方程来得到交点参数 t,然后筛选出有效的、最近的交点。
4. 简单着色模型
尽管使用的是最简单的着色模型(漫反射+环境光),但已经能够产生较为真实的效果。这让我理解了光照对物体外观感知的重要影响。
5. 图像输出格式
学会了如何生成PPM格式图像,这是许多图形学课程中使用的简易图像格式,虽然简单但能够快速验证渲染结果。
6. 编译调试过程
在实践过程中遇到了一个小的编译问题(缺少#include <iostream>和符号比较警告),这提醒我在写代码时要更加注意代码的完成性和类型安全。
下一步计划
基于今天的基础,下一步可以考虑扩展到更复杂的光线追踪功能:
更丰富的光照模型:加入镜面反射、折射等效果,实现更真实的材质表现
支持更多几何体:添加三角形、立方体、圆柱等其他基本几何体的相交检测
加速结构:使用BVH或KD-Tree等空间加速结构来优化大量物体的相交检测
蒙特卡洛采样:实现抗锯齿、软阴影、景深等需要随机采样的效果
高级材质:实现金属、玻璃、粗糙表面等不同材质的表现
纹理映射:在物体表面应用纹理,增加细节和真实感
今天的实践虽然简单,但为理解图形学中的光线追踪技术打下了坚实的基础。通过每天实现一个小功能,逐步积累对图形学核心算法的理解和实践经验。
相关资源: